Friday, May 13, 2011

Experiments in money Update!

So here is a clip from a email that I got from a friend that knew I was saving my pennies and nickles.
The Government just keeps closing the loop holes, but that's ok I'm still saving my pennies and nickles can't melt them or sell them out side of the U.S. But you can still sell them in the U.S. and we all know they will keep going up in value.


Have you ever spotted a 1964 quarter in your spare change?
Odds are slim to none.
If you’re a student of history, you know why. These coins were hoarded out of existence... years ago... for their silver content.
And that’s why beat-up quarters - dated 1964 or earlier - sell for $5 or $6 apiece on eBay.
But now, the lowly penny and nickel are following suit.
Most people don’t know this - but it’s ILLEGAL to carry more than $5 in pennies or nickels out of the country.
The U.S. Mint says, “We don’t want to see [these coins] melted down so a few individuals can take advantage of the American taxpayer.”

What’s going on here?
Well thanks to the surging price of nickel... copper... and zinc, the government is terrified. If they allow these coins to freely move about - they could disappear overnight.
In short, anyone with half-a-brain would melt them down - and double their money.
So to put a stop to this, the government has slapped a $10,000 fine or five year jail sentence on anyone caught with more than $5 in coins heading out of the country. (Thanks to David Hall Rare Coins and Van Simmons for passing this story along.)

Did you get that?
The Government will throw you in jail if you so much as try to make a $5 profit melting down pennies and nickels.
If that’s not a sign of desperation... and that the end of the dollar is near... I don’t know what is! It’s literally a financial death-threat from the Treasury.

Tuesday, May 10, 2011

Black Bean Burgers

Black Bean Burgers


I had to find out how to make Black Bean Burgers after paying $3.98 for 4 burger patties. I mean a buck Pattie get real!

So here is my try at it!

1 Can of Black Beans
1/2 Onion
1/2 Green Pepper
1 Table Spoon of Garlic Powder
1 Table Spoon of Chili Powder
1 Table Spoon of on Cumin Powder
1/2 Sleeve of Wheat Saltines Crackers
Hand full of shredded pepper Jack cheese

First drain the can of beans and rinse the put them in a blow and mash with a fork. Then add all of the spices. Chop the onion and the Green pepper and Crackers into small bits and add to the mix. Now form them into patties.
Now Cook them!
I found that the Gorge Foreman works the best for cooking them. I have heard that freezing them you can cook them on the grill. I'll will try that and let you know you can also pan fry them too.


Wednesday, April 6, 2011

Experiments in money

So I have been doing a long term experiment with money for about a year or two. I walk everyday at lunch and look for change and other things of value that people have lost. I find quit a bit of each, I like to call it Urban Treasure Hunting. So let me get to the experiment part, all of the pennies I pickup I sort out by date and all the pre 1982 pennies I roll and put on the shelf. Any thing that is 1983 or newer I put in a jar take to the bank and cash in.

 So here is the idea behind it. The pre 1982 penny's are 95% copper and worth 2 cents in copper value. So if I melt them down I just dubble my money. On a side note it's illegal to destroy U.S. currency in the U.S. so I would never do that. But you can sell it to some one out side of the U.S. for it's copper value and what they do with it is there own business.

The other though on this subject is that the goverment is going to get rid of the penny all togather. Basically because it costs the government to much to make a penny. It costs the government about 3 cents to make a penny. If they stop making them it's no longer money, so you could melt it down legaly. Also if pepole start melting them down, those coins will become more rare so they will increase in value because there will be less of them in circulation. I'm also saving nickel's because there basically just a nickel coated copper slug and there worth about 6 cents each. I also live close to the Canadian border so I save there pennies and nickle's too.

Monday, June 21, 2010

Here a few things you should know about Our Money!

Is U.S. currency legal tender for all debts?


According to the "Legal Tender Statute" (section 5103 of title 31 of the U.S. Code), "United States coins and currency (including Federal Reserve notes and circulating notes of Federal Reserve banks and national banks) are legal tender for all debts, public charges, taxes, and dues." This means that all U.S. money, as identified above, when tendered to a creditor legally satisfies a debt to the extent of the amount (face value) tendered.

However, no federal law mandates that a person or an organization must accept currency or coins as payment for goods or services not yet provided. For example, a bus line may prohibit payment of fares in pennies or dollar bills.

Some movie theaters, convenience stores and gas stations as a matter of policy may refuse to accept currency of a large denomination, such as notes above $20, and as long as notice is posted and a transaction giving rise to a debt has not already been completed, these organizations have not violated the legal tender law. (http://www.federalreserve.gov/generalinfo/faq/faqcur.htm)

What is legal tender?

31 USC 5103. Legal Tender United States coins and currency (including Federal Reserve Notes and circulating notes of Federal Reserve Banks and National banks) are legal tender for all debts, public charges, taxes, and dues. Foreign gold or silver coins are not legal tender for debts.However, there is no Federal statute which mandates that private businesses must accept cash as a form of payment. Private businesses are free to develop their own policies on whether or not to accept cash unless there is a state law which says otherwise.(http://www.moneyfactory.gov/faqlibrary.html)


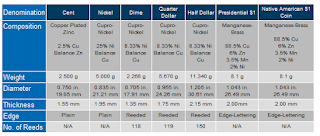
The following table gives specifications for U.S. Mint legal tender coins presently in circulation.


Quick Circulating Coin Facts:


•Mutilated Coins: United States Coins no longer fit for circulation are classified as "uncurrent" or mutilated.
◦Uncurrent coins are coins that are worn yet recognizable as to genuineness and denomination, and are machine countable. Uncurrent coins are redeemed by the Federal Reserve Banks, then forwarded to the Mint for disposition.
◦Mutilated coins are coins that are chipped, fused and not machine countable. Mutilated coins are only redeemable through the United States Philadelphia Mint facility.
All uncurrent or mutilated coins received by the Mint are melted and reused in the manufacture of coinage strips.
I have some coins that were damaged and the bank will not redeem them. What can I do with them?
The Treasury Department has prescribed regulations regarding uncurrent and mutilated coins. Let us explain the difference. Uncurrent coins are whole, but are worn or reduced in weight by natural abrasion. They are easily recognizable as to genuineness and denomination, and they are such that coin sorting and counting machines will accept them. Merchants and commercial banks will generally accept or refuse these coins at their discretion. However, Federal Reserve Banks and branches handle the redemption of uncurrent coins.

Mutilated coins, on the other hand, are coins that are bent, broken, not whole, or fused or melted together. The United States Mint is the only place that handles redemption of mutilated coins, and they should be sent to the Mint at Post Office Box 400, Philadelphia, PA 19106.
(http://www.ustreas.gov/education/faq/coins/sales.shtml)

What happens to United States coins that are no longer fit for circulation?

"Those coins are classified either as uncurrent or as mutilated. Coins that are chipped, fused, and not machine-countable are considered mutilated. The Mint redeems mutilated coins at the value of their metal content.
Mutilated coins are only redeemable through the United States Mint at:
United States Mint
P.O. Box 400
Philadelphia, PA 19105
(215) 408-0203

Uncurrent coins are worn, but machine-countable, and their genuineness and denomination are still recognizable. Uncurrent coins are replaced with new coins of the same denomination by the Federal Reserve Banks, then forwarded to the United States Mint. All uncurrent or mutilated coins received by the Mint are melted, and the metal is shipped to a fabricator to be recycled in the manufacture of coinage strips."

Thursday, May 6, 2010

Ahhh Bread the staff of life


So I got a bread machine and man it's nice!

No more $3.98 a loaf bread for me. We have 4 people in our house so we go through about two loafs a week. So far we have only made Whole Wheat Bread and we have been doing it for about two months and I will never go back to the store bread again!

It's vary easy but it does take some time so you have to plan ahead. It only takes 5 minutes to mix the ingredients and start the machine. But you should be home for the 4 and a half hours it takes to mix and bake it just in case something goes wrong like a fire. You know Murphy law the first time you leave it by its self it will burn your house down.


Here is the ingredients for the bread:


  • 1 Active dry Yeast packet or 2 1/2 teaspoons of instant yeast

  • 1 1/3 cups of water

  • 1/4 cup of vegetable oil

  • 1/4 cup of Molasses or Honey or maple syrup

  • 3 1/2 cups of Whole wheat flour

  • 1/4 cup nonfat dried milk

  • 1 1/4 teaspoons salt

  • 3 to 4 teaspoons of vital wheat gluten


Here are the keys to making this bread.

1. You must use 3 to 4 teaspoons of vital wheat gluten (Unless you like short dense loafs of bread)

2. Mix the Wheat flour and the wheat gluten and the dried nonfat milk in a bowl

3. Put the oil in the the bread machine pan first and then molasses and then the water it should be around 80 to 95 degrees

4. Add the dry mix to the pan

5. Now in one of the corners add the salt then cover it with the mix (you want it deep in the corner but not in the water)

6. Now add the yeast to the center of the mix in a hole and cover it up like the salt.

Other tips that will help:

1. use the 1/4 cup for the dried milk first then for the oil and last for the molasses this way the milk won't stick or the molasses.

2. When you measure out the flour stir it up with a spoon to fluff it up first so it doesn't pack and then use the edge of the handle to level it off in the cup you will get better results if you do this.

3. The yeast temp should be 80 degrees but I make it about 10 to 15 degrees higher because once you put it in the pan and get all the other stuff in the it cools off 10 to 12 degrees.

Saturday, January 23, 2010

Droid Dock 30 bucks (Ya Right!) DYI

So I now have a new cell phone, this one is a Motorola Droid by the way (way cool!). I guess you can get a car mount and a home docking station for ($29.99) each. When you put the droid in the home docking station it goes into media mode and when you put it in the car mount it goes into nav mode. Now true you can use apps to turn on these modes but you have to push buttons! God forbid we have to do work! Plus $60 bucks come on. Well you know me DYI.


So I guess how it changes modes is with magnets how fun is that!


I wasn't sure how to approach this I wanted to do it in metal because I'm a better metal worker then a wood worker. Since I wanted to test the concept fast I used some scrap trim that I had sitting around. The magnet came out of an old CD drive


You have to kinda play with the position of the magnets because there two magnetic switch's in the phone one for the car nav mode and one for the home media mode. I think should incorporate power and speakers next, that will be (DYI Dock 2.0) coming soon to a blog near you!

Sunday, January 10, 2010

What to do with one Old Cool Fork.

More fun with metal but the sad part is no fire for this project. So what can you do with a Old Cool Fork. Well you can make a Cool Business Card holder or a table place card holder.

This is a easy project for a quick present for someone or quick cash if you just sell them to other people. To make them you need a vice a tack hammer or any small hammer will do and a pair of needle nose pliers. The vice and hammer is for the neat 90 degree bends on the front and the needle nose pliers are for the loops on the back. A good place to find forks is the good will store or garage sales.


Tuesday, July 7, 2009

DYI Engine Generator First Steps

So I decided to take another step towards energy independence and once again it had to be DYI! I found an article in hompower magazine #42 on how to make a 12 volt engine generator. So the basic idea of of this thing is to have a small lawn mower engine a car alternator and some sort of field controller to control the 12 volt output from the alternator. Where to start? well I figure I would start with the controller first.


My long term plan is to build a small solar system you know the type with panels not planets I'll work my way up to planets later. Anyway I'm starting with the controller because I figure that I have one deep cycle battery now for my backup power for my radios, and I use a AC trickle charger to keep it topped off. So if the power ever goes out I only have the small VW solar panel to trickle charge it. So I figure if I build the charge controller first I could use it in an emergency by just hooking it up to my cars alternator. Also doing it this way I able to take my time looking for an engine and an alternator and maybe I can get it for my favorite price free.


Sunday, June 7, 2009

One Red Hot Solar Lamp

So the other day I was in the office of our environmental engineer we call her the "Green Lady" and she had the coolest little green desk lamp. when I say green I mean it was the color green and environmentally green too. It was solar powered, in the base of the lamp is a solar panel with a battery box attached to it that has 4 AA rechargeable batteries. I assume it has some type of charge controller but it might not. I asked her where she got it and she said IKEA for 20 bucks. I just had to get one and try it out but you know me MR. DYI I though of some ways to make one and even found some parts to start making one. Well before I could get the design going the "Green Lady" bought me this red one for my Birthday.


It's pretty cool I'm using it right now to light my keyboard. The solar panel/battery box comes out of the base so you can set in a sunny window to charge. The box is beveled so it sits at an angle to the sun to help it receive more sun it's a real good design.
It takes awhile to charge but it does provide a few hours of light as you can seen in the picture it puts out a lot of light. I'll post up dates after I have it awhile, so far it's a winner with me.

Thursday, February 26, 2009

Soldering fume extractor project

I've been doing allot of small electronics projects lately that require a fair amount of soldering. So I figured that it was about time I got a fume extractor until i saw the price. They ran any where from $36 to $400 bucks. So once again I'm going down the build it your self road. I started by looking through the junk box and I found a few parts i could use.


I needed a fan since that was basically what the project was all about, I found an old brush less ATX computer fan 12V Dc, and a old early 90's styled bag cell phone hand set car Mount to mount the fan on. I also found a computer power switch with led power on indicator lights I figured I could replace the led's with bright white led's for lights to see what I'm working on and use the switch to turn on the fan.


To mount the fan I needed to design a bracket to attach the fan to the cell phone bracket. I had a friend who is a sheet metal guy make it he soldered small tab on the bottom not sure why he didn't make it from one peace?
A little sheet metal and a few brass crews and we have a mounting bracket!
Next I mounted the power switch and the led lights on the bracket I still need to get another white led.
Now with the fan controls and lights mounted its time to work on the base and power supply.
So stay toon for the next installment of the Soldering fume extractor project!!!

Monday, February 9, 2009

Under the sun so little time (Update!)


Well I thought that my solar creation at first was working well, but it was not charging the phone battery as fast as I was discharging my solar charger. So I tried just charging the VZ 6800 phone every few weeks. This way it would have two weeks between discharges to recharge the battery in the solar charger. It work, but it only made my VZ 6800 energy independent for 6 days out of the month.


Now as for my other phone the samsung, I could charge it and that worked well, but it doesn't get used every day so it would hold a charge for about two weeks anyway. I did stumble across some good news though, when I was testing the output of the battery and the solar panel I disconnected it for two weeks and forgot to hook it back up.

What I had found out was on a vary Sunny day the panel will power the VZ 6800 with no battery attached at all in full sun. I think that in the winter months I will have to go two weeks or get more panels. In the summer or on bright days in February it will charge it with out a battery or with it. So the end result is it works it just works allot better with more sun wow imagine that?

Wednesday, October 22, 2008

Harvest time!

The final harvest is here! All of the plants have have been killed by the frost and I still have lots of green tomato's! So I pulled all of the plants and cleaned out the beds and picked tomato's that were left over. The Deer earlier in the season munched my plants down so they got a vary late start, so I have allot of Green tomato's. Actually I only got a few red tomato's from my plants but that didn't stop me from preserving my tomato's for winter time stews and chili.

\


Well here's an up date on how the tomato ripening tray is working it works great!


As you can see I'm storing them a way for a cold day, when hot chili will taste good.


Next year I think I will try canning, freezing works good but it takes a lot of room in the freezer.

Wednesday, October 15, 2008

So many projects under the sun so little time (Update!)

Well I have a small step towards energy independents! I took the VW solar panel and retrofitted the ODBII plug with a set of Anderson power pole plugs so I could charge a 7.2 Amp hour 12 volt sealed lead acid Battery. I then took an old Pampers diaper wipe box and put the battery in side and mounted a cigarette lighter socket in the side of the box. After that I cut a chunk of wood to screw the cigarette liter socket to stiffen it up, then I screwed two four bladed terminals blocks to the other end of the chunk of wood.


With that done I connect the battery and the cigarette lighter socket to the terminals and made up another set of Anderson power pole plugs to connect to the terminal and ran them out off the side of the box to plug in the solar panel into for charging the battery.


The best part of this set up is I can use the Anderson power pole plugs to charge the battery from the solar panel or plug battery from the box into a radio or any thing else with Anderson power pole plugs on it.


Well I conclusion have made a small step towards energy independents because i can charge my cellphones from the sun and all the other small gadgets like my ipod and other stuff. In the design I have only a few concerns, one I think I need to vent the box because of heat. Also I'm not sure if the terminal blocks will heat up on the wood block under heavy load could be a problem. The last one is the charging circuit was for a car battery not a small sealed lead acid Battery. It does work I can charge my phone so I guess I will test and let you know what happens in a later update.

Friday, October 10, 2008

Time to harvest the tomatos! But there Green!


Well it is time to harvest my tomato's, But what do you do with green tomato's? We've have had at least 3 hard frosts and it end of October. I tried to cover the tomato's so the frost wouldn't get them. It worked OK, but I keep forgetting to put the cover on at night and take it off in the morning. So for this year I gave up because the plants were half dead and full of green tomato's. Plus a lot of them are splitting because there big. So what to do? Well I remembered mom putting tomato's in a paper bag to ripen but that was one at a time. I know if you put tomato's in the sun the outside will turn red and look ripe but the inside will still be green. So i did some research and found tomato's ripen from the inside out and from the bottom up and they don't need sun to do that. I Guess you can just put them in a warm dark place and the will ripen on there own. Well that took me to my next project a tomato ripening tray!
Basically the tray is an optional pot tray from my kitchen cabinets that i never installed. I used it so if any of the tomato's got rotten the mess would be contained, I also put some plastic in the bottom of the tray so if any did rot then the tray would be protected. Then I cut a paper grocery bag down one side and all way across the bottom and put it in the tray and cut another to go over the top this way it keeps it dark and holds some heat plus protects them from dust or any thing else. So far so good it works well! I did find out a few things a sense tomato's ripen from the bottom up turn them over that way the weight is on the part that ripens last and it won't get mushier. Also as they ripen i keep the green one on side and the more ripe one on the other side not sure why, but they seems to ripen then at the same pace. Ya I know it doesn't make sense but what can i say.

Sunday, September 7, 2008

The latest back yard project (Just Finished)

This one was a back breaker the patio is 60SQ FT at 42 pounds a block. The dirt area is 400 SQ FT and took 5 yards of pea gravel to fill. The hard part was moving the 5 yards off pea gravel from the front yard to the back by hand I wish I had a bob cat.


I think our new patio and play area for the kids turned out nice.


The best part is now have 460 SQ FT less of lawn to cut!

Thursday, September 4, 2008

Sun Dryed Jalapeno pepper


The chives went so well I though I would try some Jalapeno pepper! I didn't get as much out of The Jalapeno peppers as I though I would. I think that's why people tie them up with strings to dry them and then crush them for the pepper, well lesson learned. It was still better to save them while they were good then having to toss them out once they went bad.

This is how they turned out.

Tuesday, September 2, 2008

Sun dryed Chives


I decided to try my hand at dehydrating some of my chives from my garden. I decided the best way to do it was to use a pair of scissors and cut the chives and then wash them after washing the chives I used the scissors to cut them in small uniformed peaces. I put the chives on a baking pan on the deck between the hours of 12pm to 3 pm that's when the sun is the hottest took about 2 hours.


this is what they looked like when they were done not to bad.

Sunday, August 24, 2008

My version of a Rememberall

This is my version of a Remberall to help you remember trips and places. I though of this well in Santa Monica at the Pier there was a guy there that for 10 bucks would write your name on a grain of rice. I though it was cool and a neat way to remember my trip to the pier but not for 10 bucks. So I though I'll just find a rock to take home to remember the trip. Well I got home and was going to put my rock with the rest of the rocks from other trips, when i started to look at the others and couldn't remember where they came from,so i came up with this idea. You have to love sharpie markers you can use them like duct tape!

Friday, August 22, 2008

So many project under the sun so little time to get them all done

So I was on eBay the other day and was looking for solar panels and came across these VW solar panels. There pretty cool they were going for around $22 - $50. I was wondering where they came from because as far as i knew VW wasn't in the solar business. Well there not, the panels were made by IPC solar for VW to keep there car batteries from going dead well there cars were being shipped from Germany. So the question is how were the people on eBay getting them? Why because there cool and I wanted one to play with for my ham radio emergency power project. So I found some guy's blog like mine and found out if you ask the VW dealer they might just give you one. I asked they said no that they ship them back to VW. Not true! A friend of mine with a vary nice Audi who has allot of work done on his car asked one of the mechanic's at the dealer for me and he produce 2 of them one me and one for my friend.